Contents
 eSalesTrack Help Menu
    User
       Getting Started
          New User Guide
          Default Modules
          Contact Manager Template
          Business to Consumer Template
          Business to Business Template
          CRM Lite Template
          CRM Product Manager Template
          CRM Template
          Tools
          My Information
             Personal Preferences
                Change Password
                Edit Information
          Home Page
             Creating Dashboards
                Creating Widgets
                   Appointment
                   Graph
                   Links List
                   Task
                   MiniReport
                Publish Dashboard
                Subscribing to Dashboards
             Search
             Libraries
             History
             Quick Access
                My Documents
                   Upload Documents
                   Publish Documents
                   Subscribe to Documents
                Team
                My Email
                Recycle Bin
       Modules
          Types of Modules
          eView
             Editing Records in eView
             Search eView A-Z
       Data
          Reports
             Creating Reports
             Report Manager
             Edit a Report
             Copy a Report
             Clone a Report
             Publish a Report
             Subscribe to a Report
             Delete a Report
          Creating New Data
             Creating Records
                Primary Records
             Editing Records
             Cloning Records
             Collapse Sections
          Views
             What is a view
             Creating a View
             Searching for Records
             Creating Reports from a View
             Creating a View to Show all Records
             Manage Views
                Clone Views
                Copy Views
                Publish Views
                Subscribe to Views
             View Groups
                Editing View Groups
          Manage Data
             Deleting Records
             Recycle Bin
             Activate Records
             Inactive Records
                Activate Records from the Recycle Bin
                Activate Records from the Profile Page
                Inactive Records View
             Permanently Delete Records
             Exporting
             Importing
                Formatting an Excel Spreadsheet for importing
                Import Troubleshooting
                Import Log
       Activity
          Task
             Creating a Task
          Calendar
             Request Additional Calendars
             Sharing Calendar
          Appointments
             Creating Appointments
             Recurring Appointments
       Email and Marketing
          Templates
             Creating Document Templates
             Using Document Templates
             Creating Email Tempaltes
             Using Email Templates
             Image Gallery
             Click-Through Links
             Word Plugin
          Automation
             Add Notification
             Manage Notifications
          Email
             Email Settings
                SMTP
                Setting Up Your E-mail in Microsoft Outlook - POP 
                Setting Up Your E-mail in Microsoft Outlook - IMAP 
             Mass Email
                Mass Email Queue
             Sending Emails
             Creating Email Campaigns
             Outlook Plug-in
             Outlook Plug-in Troubleshooting
       Training
          Free Daily Training Webinars
          eSalesTrack Advanced Customer Services
       Mobile
          Additional Tabs
          Adding Tasks
          Editing Records
          Finding Records
          Adding Appointments
    Administrator
       Modules
          Add Module
             Normal Module
             URL Module
             Delete Module
             Stacked View
                Sales Funnel
             View Only Module
          Field Creator
             eFormula
                Creating an eFormula Field
                Formula - Date
                Formula - Text
                Formula - Currency and Numeric
                Formula - Converting
             Creating Fields
                Picture Fields
             Editing Feilds
             Field Creator
          Unassigned Records
          Form Manager
             Layouts
                Creating New Layouts
                Assigning Layouts
                Multi-page Layouts
                   Multi-page Layouts
                   Linear Layout
             Putting Fields on Form
                Adding One to One Fields
                Adding Parent Fields
             Key Fields
             Sections
             Form Objects
             Additional Tabs
                Activities Tab
                Content Tab
                Email Tab
                Notes Tab
                Team Member Tab
                Deleting Tabs
          Mapping
             Add Mapping
          Portal and Web Forms
             Create a Web Form
             Manage Web Fomrs
             Hidden Fields
          Relationships
             View Relationships
          Mobile
             Mobile Layouts
             Mobile Settings
       My Company Profile
          Company Profile
          Locations
       Display and Themes
          Change Header
          Change Colors
       Company Information
          Subscriptions
             Manage Subscriptions
             Delete Subscription
             Subscriptions
          Users
             Creating Roles
             Sharing Records
             Assigning Roles
             Add User
             Groups
             Reassigning Records
             Manage Users
             Inactivate User
    Videos
 Welcome


LinkIndexPrint

Home > eSalesTrack Help Menu > User > Activity > Appointments > Creating Appointments

Calendar

Creating Appointments

You can create appointments from more than one place in the eSalesTrack application. You can create a new appointment:


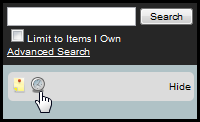
1. By clicking on the Create Task/Appointment clock below the search bar or in the top right of the Module form view

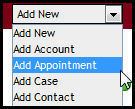
2. Clicking on the Add New drop-down feature in the upper right section of the screen and clicking on Add Appointment

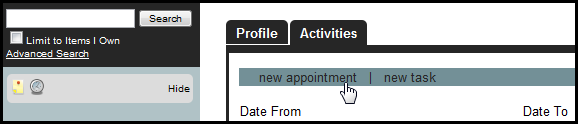
3. Clicking on the new appointment link in the Activities tab Details page to add a task to that specific account.

4. Clicking on the Create New Appointment link the Calendar home/landing page

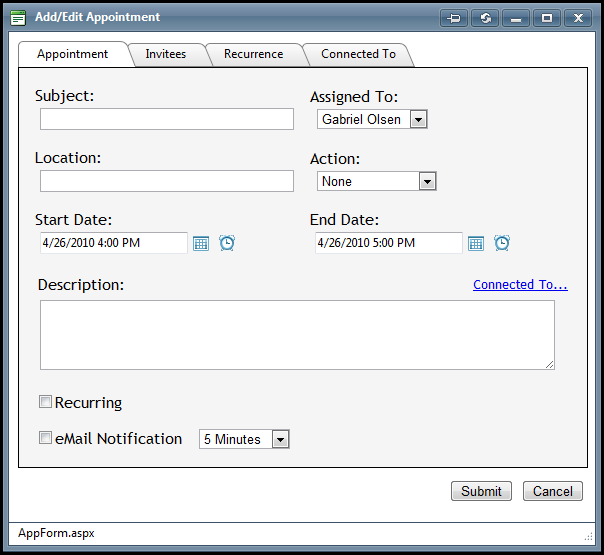
Clicking on any of these takes you to the Add Appointment/Task page where you can add the appointment information.

Adding Appointment Information:

Adding Appointment Information: Only the Subject field is a mandatory field while adding an appointment.

Subject: Add a name for the appointment.

Assigned To: Select which team member to assign to the appointment

Location: Type in specifics of the location of the appointment

Status: Select the status of the appointment

Action: Select the action corresponding to the appointment

Start Date: Type in the date the appointment starts, or select the appointment date by clicking on the calendar icon () to the right. You can also chose a specific time of day by choosing the clock icon ().

End Date: Type in the date the appointment ends, or select the appointment date by clicking on the calendar icon () to the right. You can also chose a specific time of day by choosing the clock icon ().

Connected To: Select the account/contact/opportunity to assign the appointment to from the drop-down list.

Description: Type any additional information you want visible to the account

Check the Recurring box if you want the appointment to repeat

Check the eMail Notification box if you want an email notification sent to the team member assigned to the Appointment, and any of the invitees to the appointment. Choose from the drop down when you want the email notification to be sent.

There are 2 unique features to Appointments (that Tasks do not have)

You can invite others to Appointments, either through eSalesTrack or through their email calendar (Outlook, Google, etc.) by clicking on the Invitees tab.

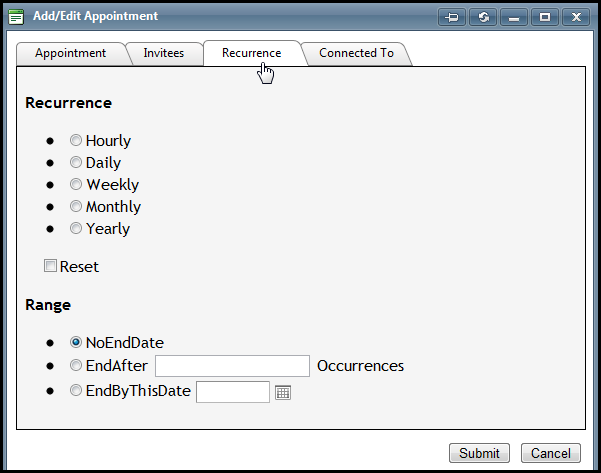
You can set the Appointment to recur at various intervals for either a specific amount of time or with no end date, by clicking on the Recurrence tab.

Click Submit to save the appointment.

See also